Two months ago, the Sumos were sitting around having tacos and whiskey (typical lunch here), and a question came up:
“If you had to grow a blog from scratch with no existing audience or mailing list, how would you grow it to 10,000 visitors per month, in just a few months?”
Over 350,000 sites have Sumo installed, but very few have reached this traffic tipping point. Maybe you’re still working to hit that 10,000 mark.
To help you get there, I want to show you how to grow blog traffic by sharing the strategy I used to increase traffic to my personal site, nateliason.com, to 50,000+ visits a month:
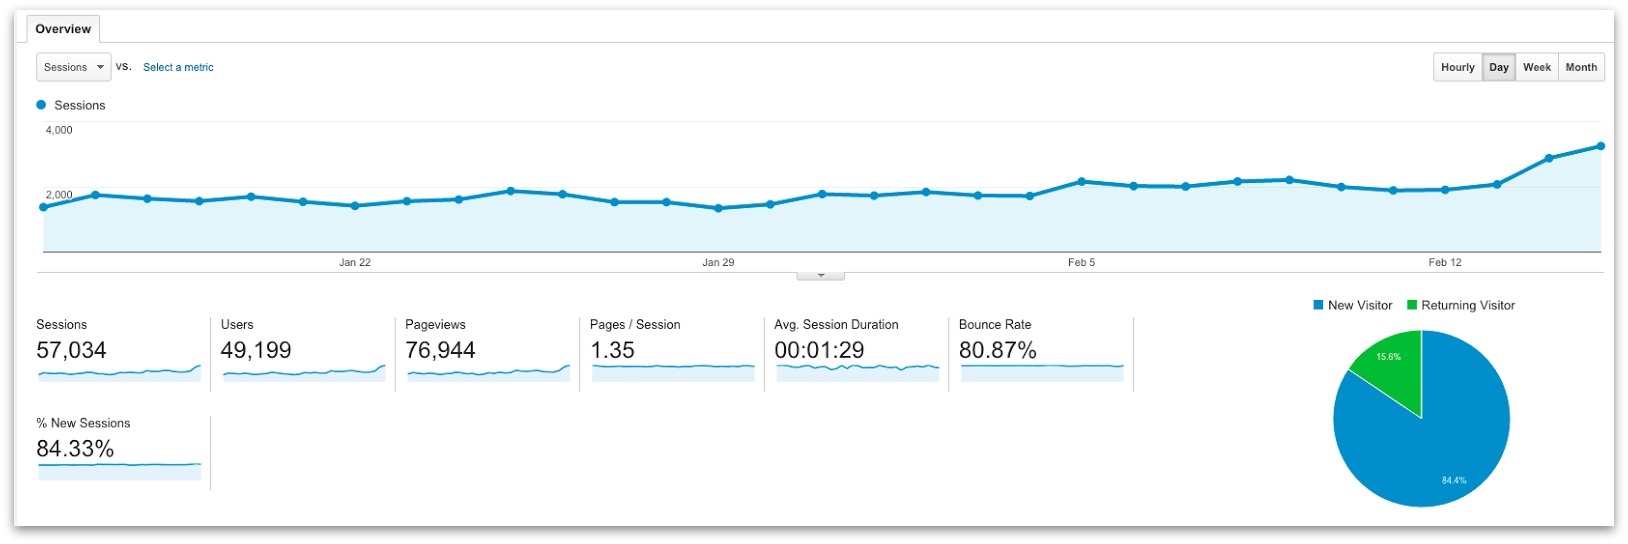
And I’m going to show how my site’s traffic increased steadily over the course of December, despite publishing only one article and not emailing my list:

The reason I saw so much traffic with little time spent?
Search Engine Optimization (or SEO).
Yes, you’ve read unsatisfying articles about SEO before, but I’m going to show you the exact steps I follow to take advantage of it and actually get results.
I’ll walk you through how I’d use the same strategies that have worked on nateliason.com (and some other things that I’d do if I had more time for it) to grow a brand new website to 10,000 visitors a month, all through a focus on SEO.
And, as promised, I’ll talk about how I’d do it assuming I had no existing audience, no big blogs (like this one!) to link from, no connections in the industry, NADA.
- Pick the Topic
- Create an Initial Article List
- Prioritize Your Articles
- Pick Your Top 5-10 Articles
- Create a Schedule
- Create a List of Similar Blogs for Guest Posting
- Write The First Article
- Create a Content Upgrade
- Promote Your Article
- Create a List of Guest Topics
- Start Guest Posting
- Repeat Steps 7 through 11!
Step 1: Pick the Topic
(Skip this section if you already have your site built)
It’s popular to recommend going through Google, BuzzSumo, Facebook groups, etc. to try to find the perfect topic to build a high traffic site around… but it’s all a waste of time.
Why would you build a site about anything you’re not passionate about?

For the sake of this article, I’m going to start a site called Nat Likes Tea at natlikestea.com.
I like tea, mention it at least once in most of my articles, and all the good “tea” puns are taken: honest tea, ingenuitea, insanitea…
Nat Likes Tea it is.
Step 2: Create an Initial Article List
With the topic in mind, I’d come up with an initial list of articles that I could write, and keep them all in a spreadsheet.
By doing this, I can make sure that I’m writing about the best topics to go after, not just picking things willy-nilly. The first couple ideas I have might be fine, but by spending some time to put all the options out there I can be sure that I’m spending my time as effectively as possible.
The easiest way to make this list is to come up with a few article styles, then mix and match styles and content to build a huge list.
For Nat Likes Tea (NLT from now on), I might have these categories:
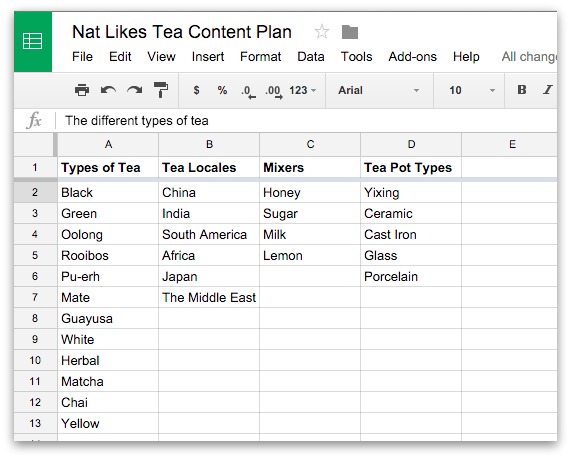
Then, I’d make a “generator” column like this one:
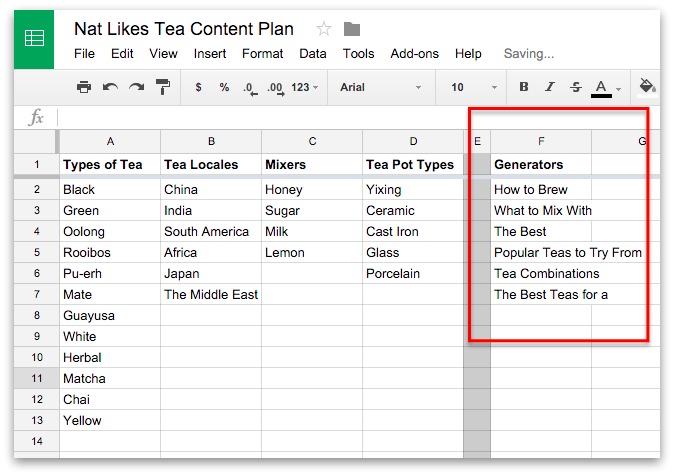
And then I’d use that with the “CONCATENATE” function to make up article topics:
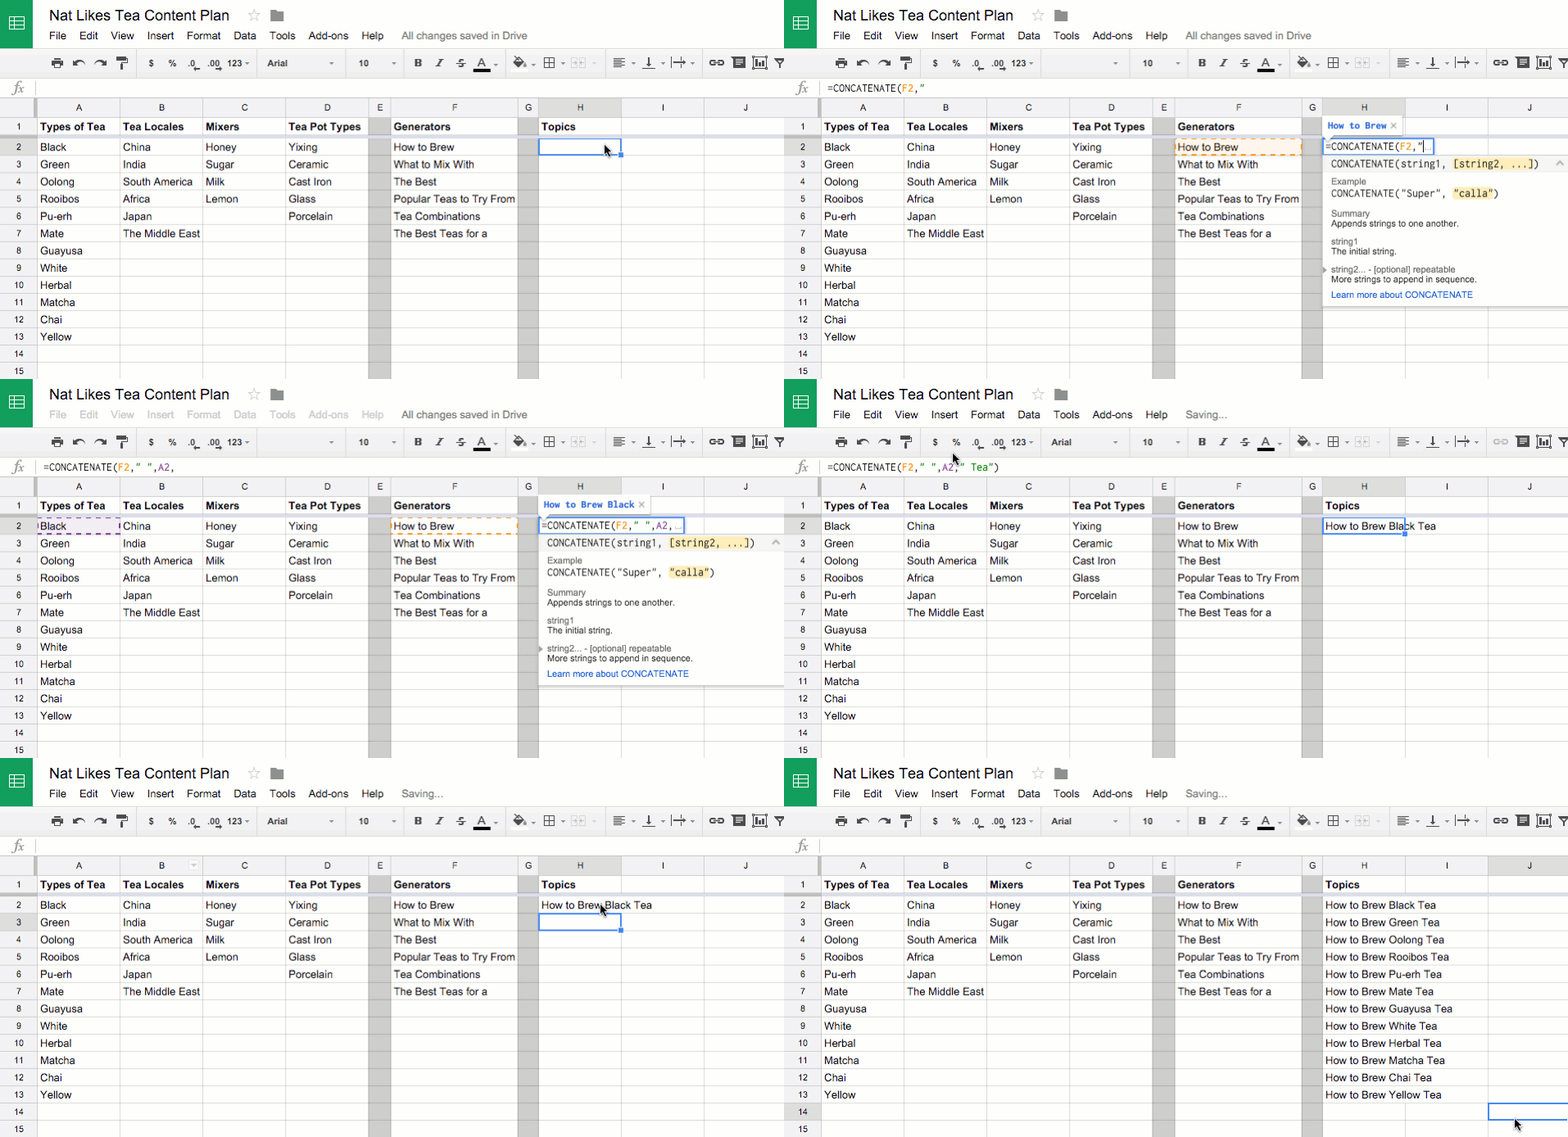
And then add those to a new Worksheet for my topics:
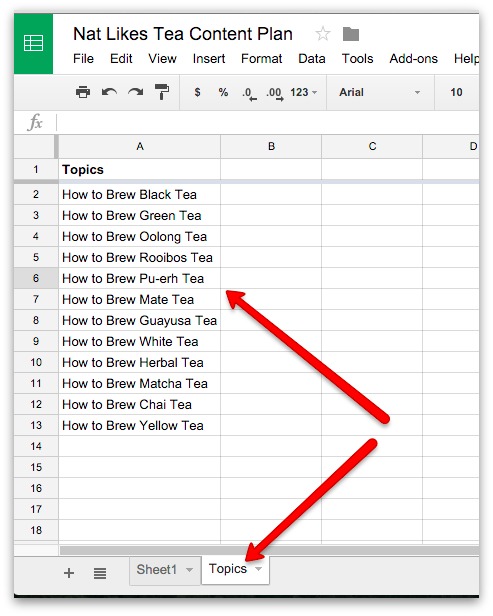
Pro tip: If you paste them and get a REF error, do “Paste Values Only”
Then I’d repeat that for all the other combinations of things I could write about, until I have an initial list of possible topics:
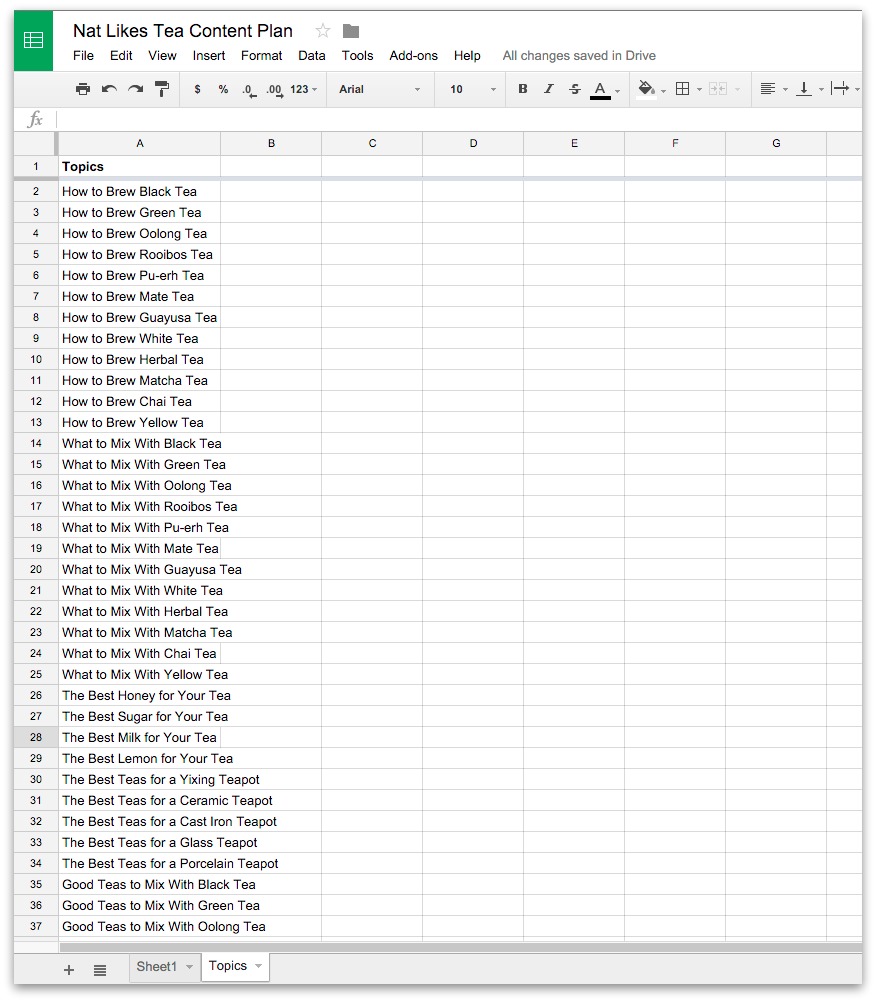
Now, I can start listing some of the more meta topics that I can think of. These are the ones that would be longer, more in-depth posts, and will likely have higher SEO value.
This is why you should write about something you’re already passionate about. It’s way easier to come up with these big meaty topics when you know the subject matter already, and odds are that friends have already asked you questions related to some of them:
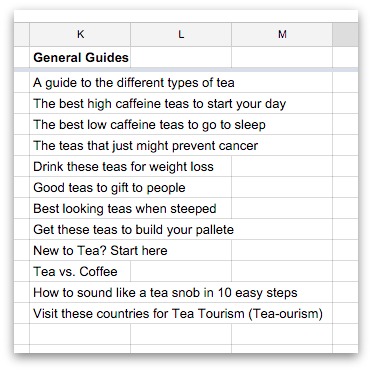
Then I just take those and add them to the list, and now we have our initial list of things I can write about!
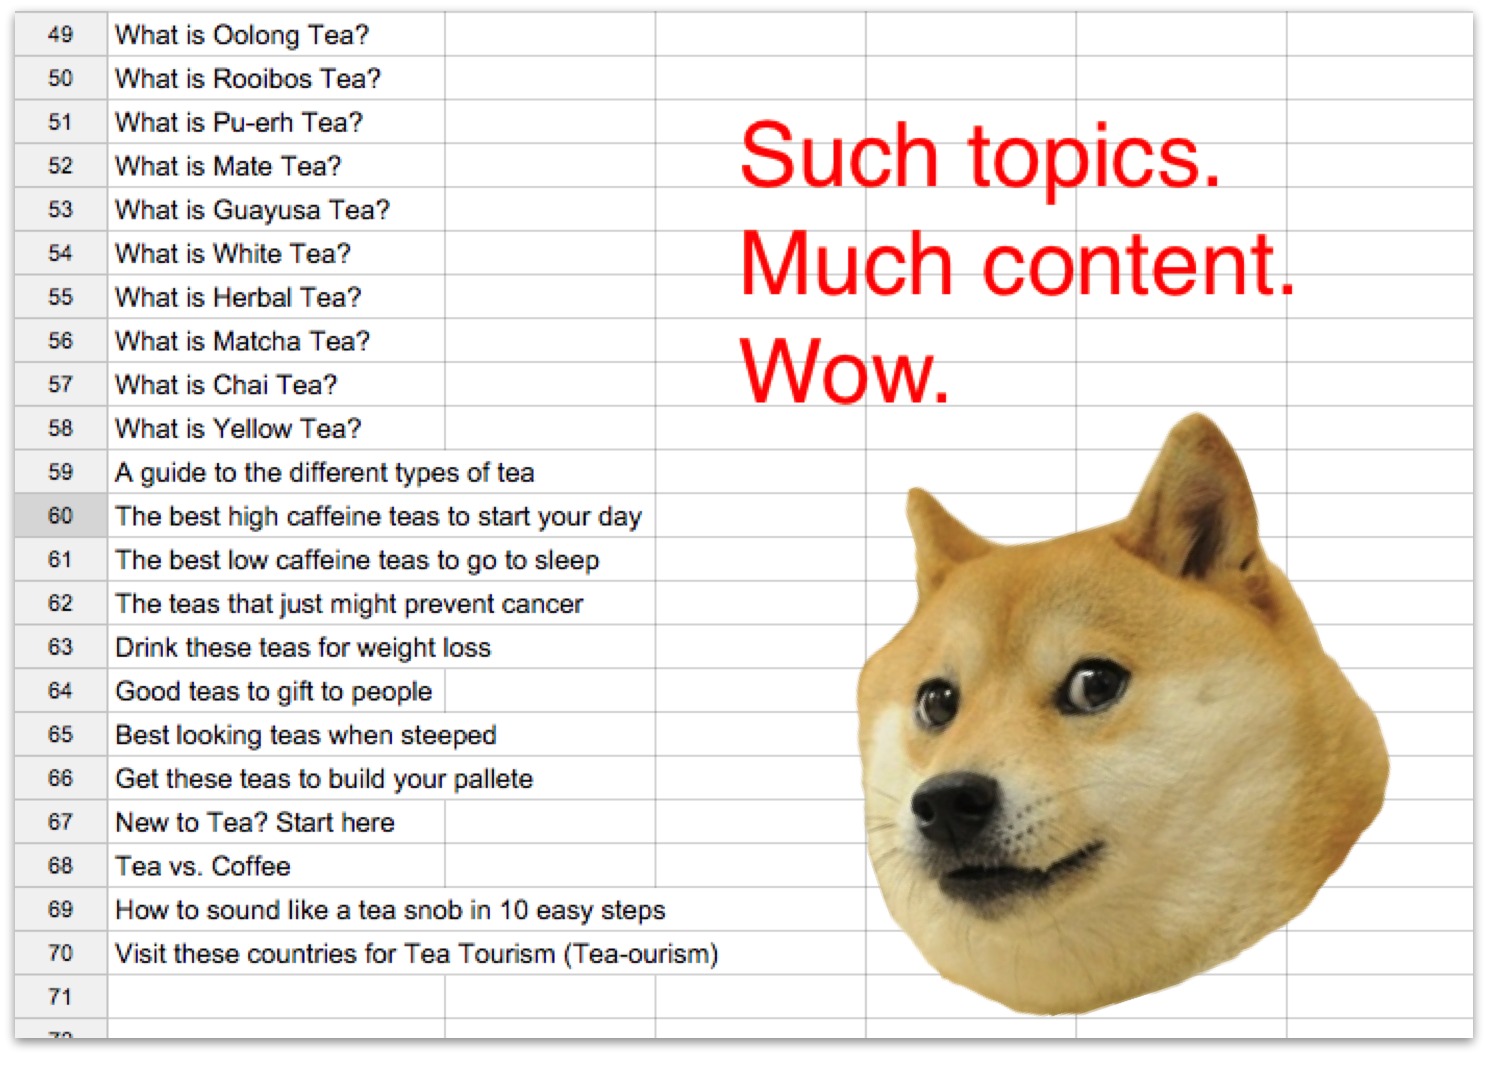
All that’s left is lock myself in a Starbucks and start doing lines of ground coffee beans until they’re all written.
Or, for the sake of my nose and adrenal glands, we could prioritize them.
Step 3: Prioritize Your Articles
Now that we have all of our possible topics, we need to figure out which ones it makes sense to focus on for our site (in order to get that sweet sweet SEO traffic), and which ones are fine to give to other people as guest posts.
To do that, we’re going to rank our posts by Depth, then SEO value.
Ranking by Depth
I’m going to go through and assign a score of 1 to 3 for depth to each topic on the list:
- 1: Shorter, fun, one-off post. Probably < 1,000 words
- 2: Somewhere in the middle, 1,000-2,000 word guides
- 3: Massively useful in-depth guide on a topic, likely 2,000+ words
Don’t sell any of your posts long, if they could fit into a bigger post (within reason) then they’re a 1 or 2.
Think of it like a pyramid, with your 3s as a base that the other article ideas build on top of or expand on.
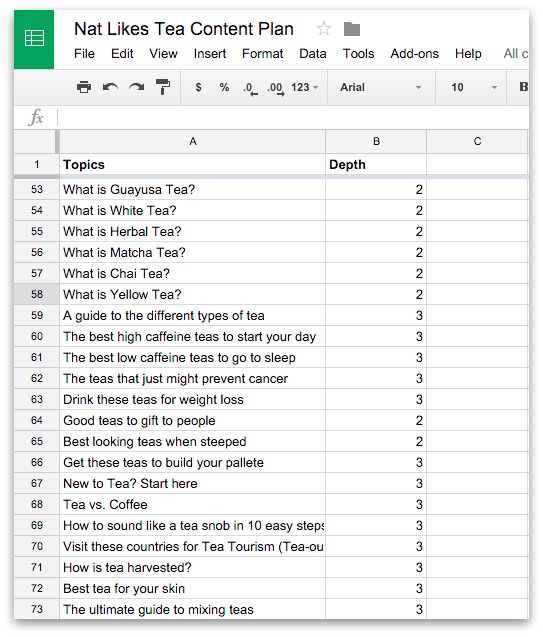
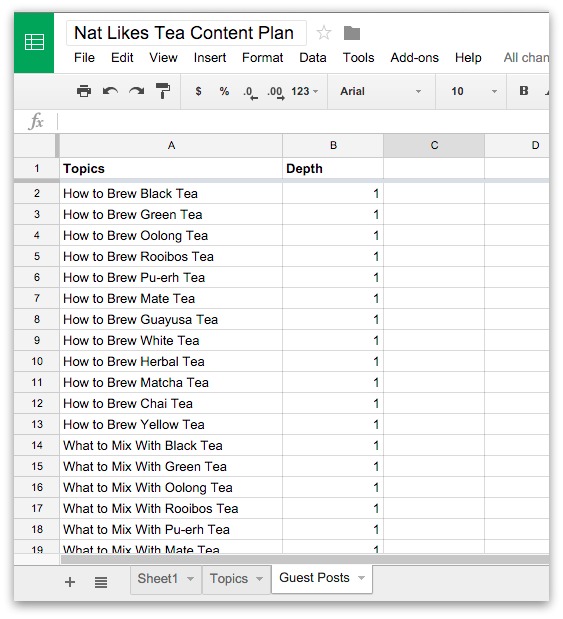
Then, take all the posts you ranked a “1” and put them in another Worksheet labeled “Later Posts”:
Compare SEO Value
With the 2s and 3s, we’re going to figure out how valuable they are from an SEO perspective. This means assessing how many visitors we could potentially get to them from Google as a result of people searching for those topics.
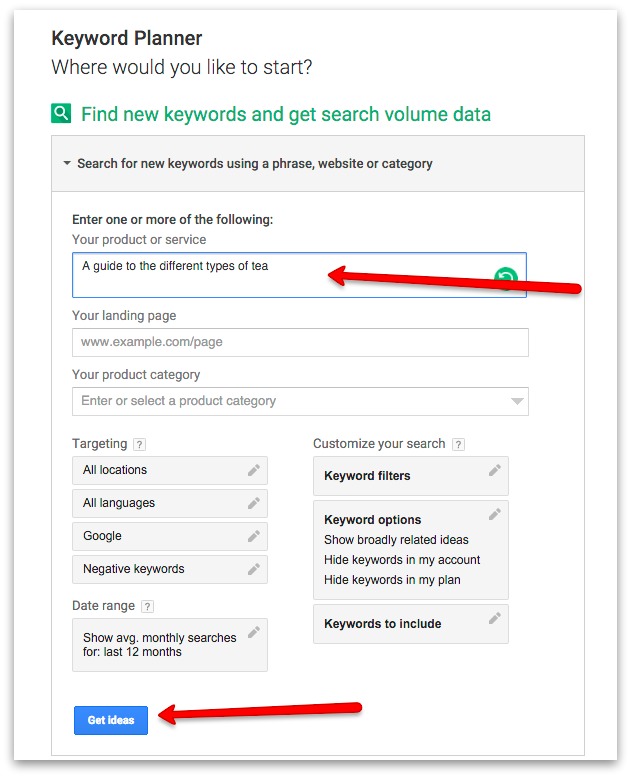
First, go to Google Keyword Planner.
Then, take a topic you came up with, and plug it in as you have it:
See what the results are:
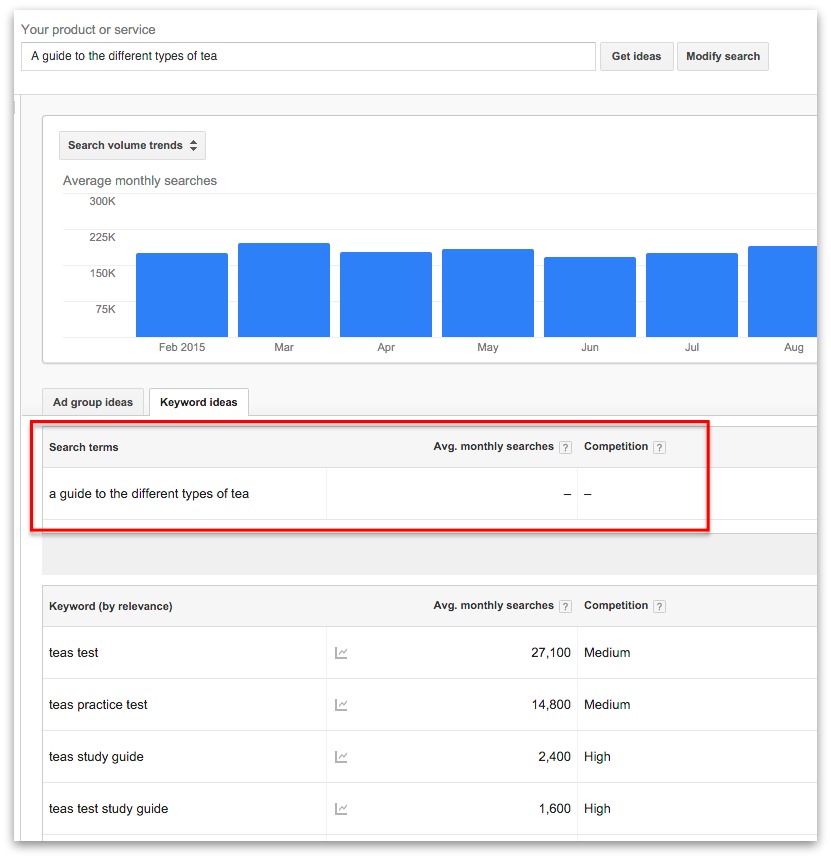
In this case, there are almost no monthly searches for that topic, so we can plug some variations into that search bar at the top until we find a keyword (it’s a keyword even if there are multiple words) with a high volume:
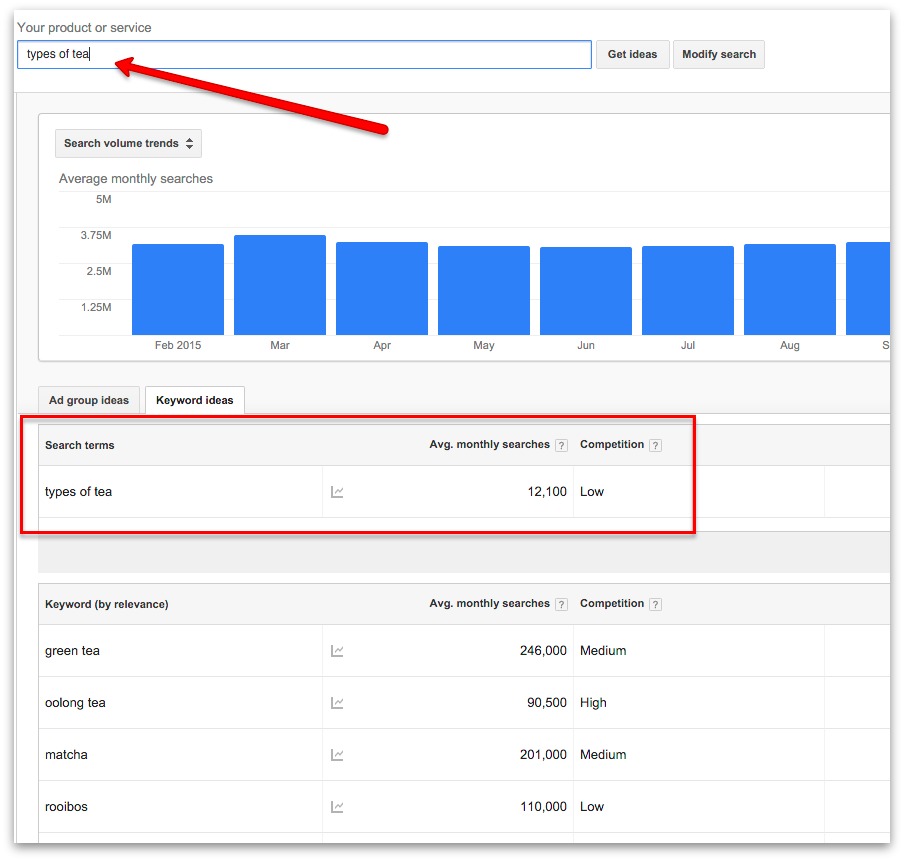

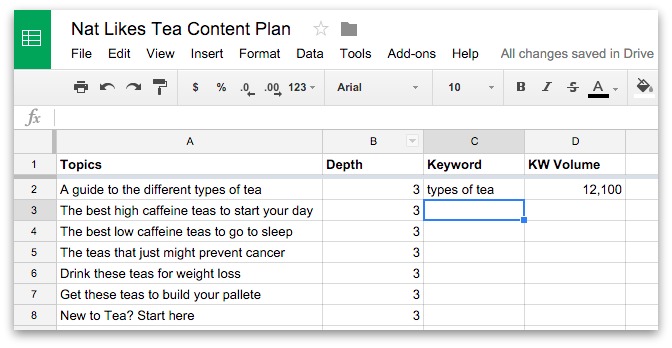
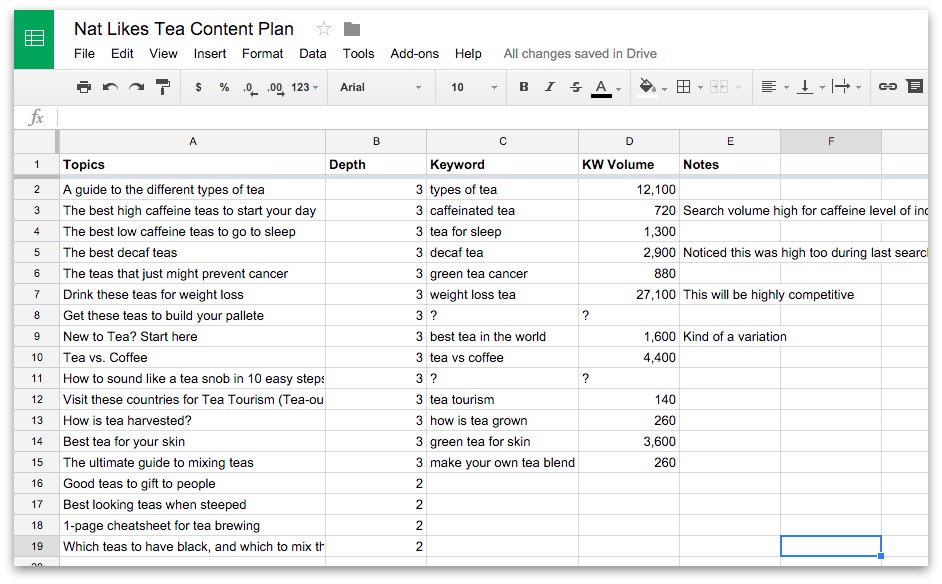
Now I just take that Keyword and the Keyword Volume, and add it to our spreadsheet:
As you’re researching, you’ll come up with more ideas. For example, when I was looking for a good keyword for “high caffeine teas,” I noticed that there was a lot of searches for the amount of caffeine in specific types of tea:
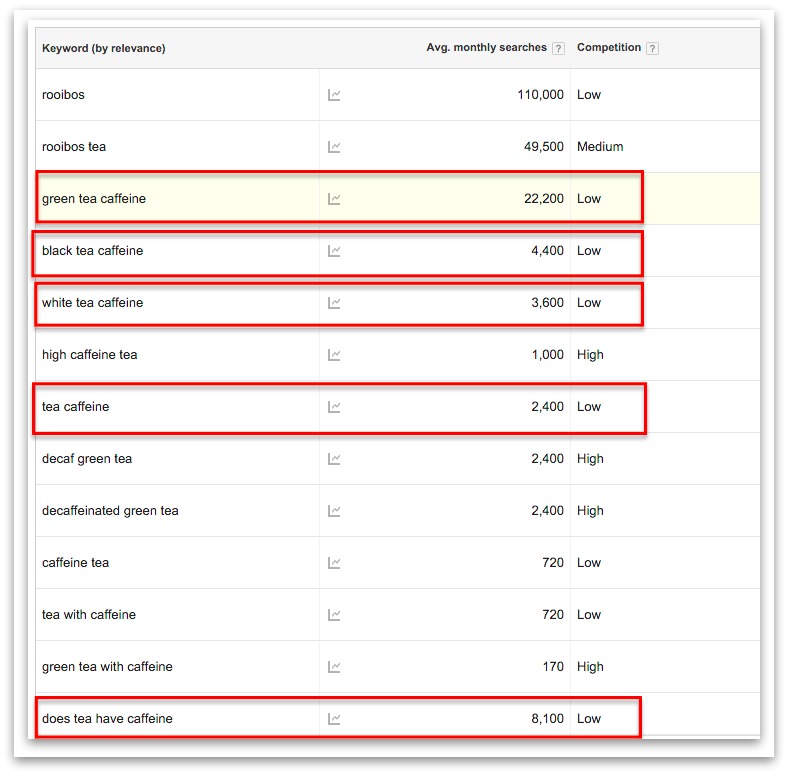
So I made a note to myself to add more topics around that later.
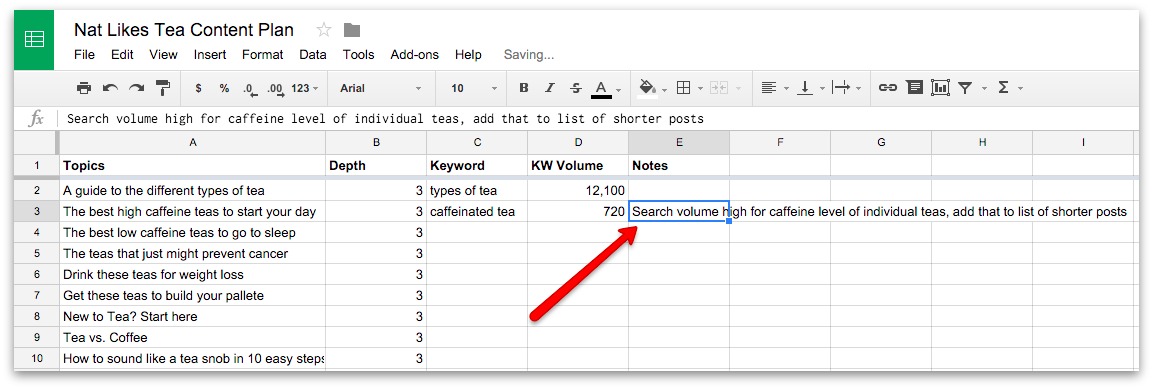
And then you just need to repeat this for all of your topics, or at least all of your “3” ranked ones.
Disqualify Tough Competition
Once I have my list of keywords, I’d go through and make sure that none of them are so competitive that I shouldn’t bother trying to rank for them (yet).
This does NOT mean to look at the competitiveness rating in Keyword Planner.
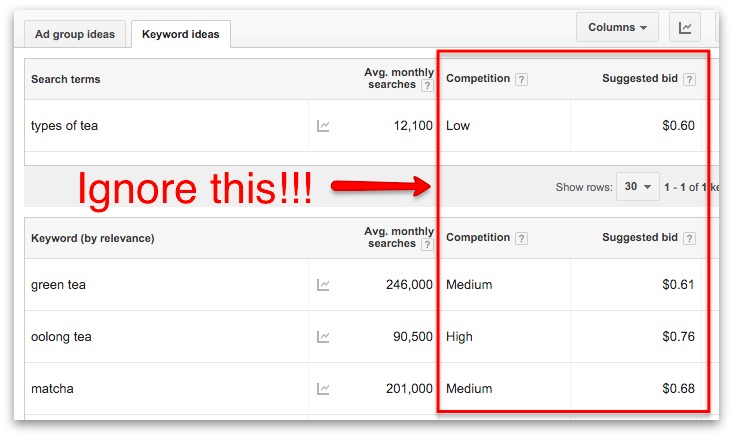
That competitiveness ranking is how competitive the ads are. Since we’re not buying ads, we don’t have to worry about how many other people are buying ads.
What I mean by competitiveness is who else is ranking for this keyword in Google right now.
All I have to do is take each keyword, plug it into Google, and see what comes up. I’ll also use the Moz Toolbar to tell me how highly ranked the pages are.
If there’s a few major sites competing on a keyword, I’ll highlight it in red, but if it looks like smaller sites that I can definitely compete against then I’ll move on.
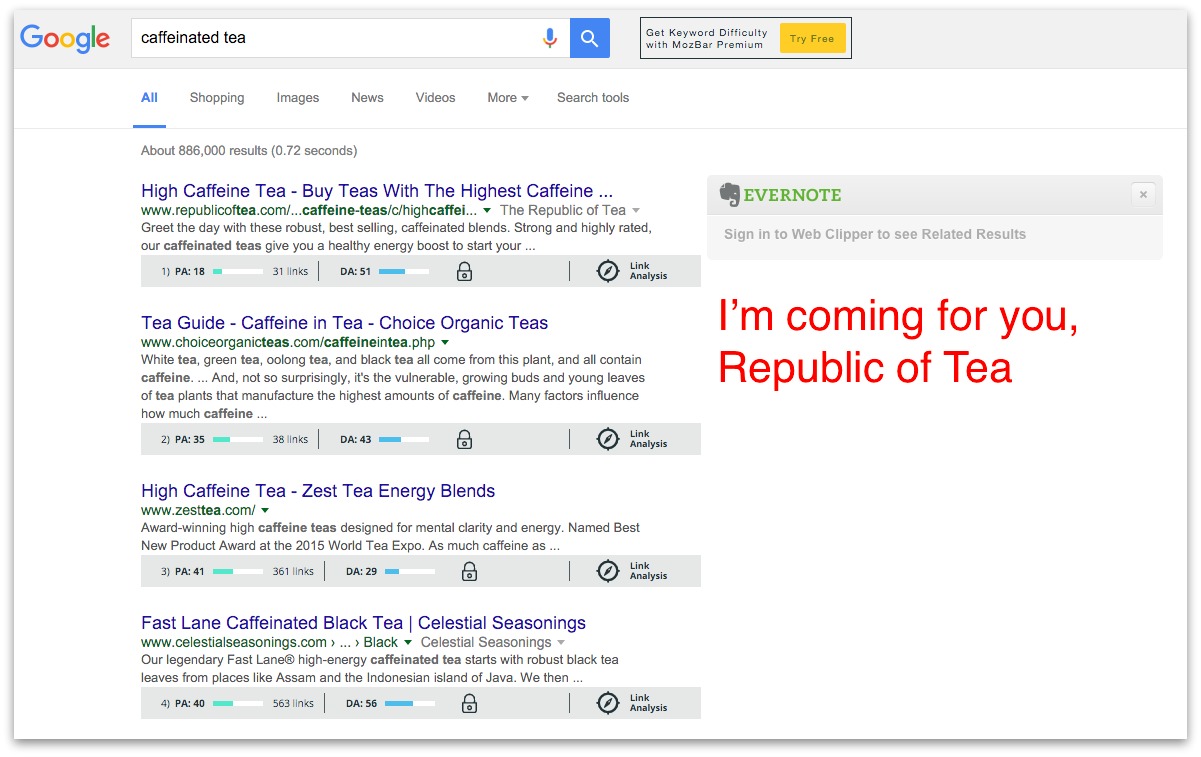
You might see results from social media, Amazon, and other “big” sites in the results, but don’t let those scare you off.
Since these sites cover such a wide variety of topics you can still compete with them, and if all you’re seeing are social media results that’s a good sign that no one has written a good article on the topic.
Step 4: Pick Your Top 5-10 Topics
With your list of topics (excluding the ones that seem too competitive), it’s time to pick the 5-10 that you’ll put on your site.
With just 5-10 articles, you can easily reach 10k visitors a month. I currently get ~2,500 visitors per day from just 4 of my articles, so if just one of your articles reaches that level then you’ll have hit the goal.
In this case, I would go with:
- Drink these teas for weight loss
- A guide to the different types of tea
- Tea vs. Coffee
- Best tea for your skin
- The best decaf teas
- New to Tea? Start here
- The best low caffeine teas to go to sleep
They’re all not too competitive, have a large enough search volume to each get me 5,000+ visitors a month (anything over 1,000 is a safe bet), and they’re topics I want to write about.
Important note: the “keyword volume” is not an absolute, it’s only an indicator. For example, the keyword “water fasting results” has a monthly keyword volume of 2,400, but my article targeting “water fasting results” gets 15,000-30,000 visitors a month.
This is because 80% or more of searches are unique. They’re long highly-specific searches (e.g. “what happens to your body if you don’t eat and only drink water for 5 days”) that are rarely repeated, and Google just makes its best guess to match those to easier keywords.
10,000 visitors per month is roughly 333 per day, so each article only needs to get 30-60 visits per day. Not a crazy high bar.
In fact, you can plug in how many posts you want to write to see what traffic amount you need on the spreadsheet. Just set your monthly goal and how many posts you want to write:
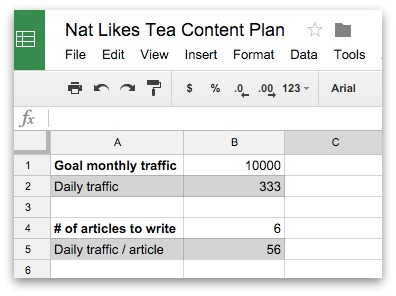
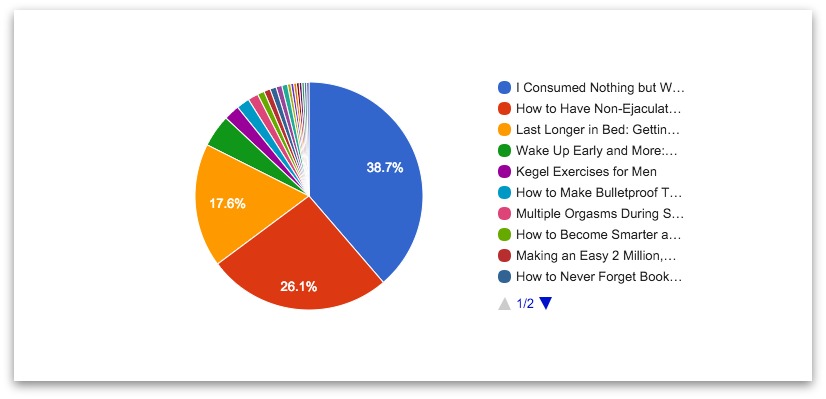
Just so you know though, it won’t be an even spread. A few articles will get substantially more traffic than others (the 80/20 rule at work), so when you’re picking topics, pick ones that could be massively popular (volume of 1,000/month or higher).
Here’s the relative traffic amounts for the top 20 articles on my site to give you an idea:
Step 5: Make a Schedule
Before you start writing, create a schedule in Google Calendar for how often you’ll publish, both on your site and other sites.
Aim for a minimum of two posts per month on your site, and one post a week on other sites. If you want to post more, put more time into posting on other sites. That’ll have a bigger ROI for you in the short term.
But the most important thing is that once you make the schedule… stick to it. Lock it in, and make sure that you’re getting your articles out when you say you will. That’s the only way you succeed at this.

Step 6: Create a List of Similar Blogs for Guest Posting
We’re almost to the writing! I promise! This is the last step before you buckle down with your typewriter.
You need a list of blogs that you can guest post on, and that you want to link back to you. The reason we’re doing this now is that once you have your list, you can include links to other people’s sites in your articles to earn good karma with them.
Think about it. What’s more appealing:
“Hey I just linked to your article about XYZ from my article about ABC. Seems like we have a lot of topics in common, would love to put something together for your audience about DEF if that’s interesting to you :)”
Or
“Hey can I write stuff on your site to promote my site?”
Obviously the first one, since you’ve already done them a favor by giving them a link whether or not they let you guest post!
And ideally, you’re doing this over separate emails (so one that says “hey I linked to you” then a follow up later asking about guest posting), which means that in your first communication you’re not asking for anything, just making their life better.
Add a worksheet like this one to your content plan:
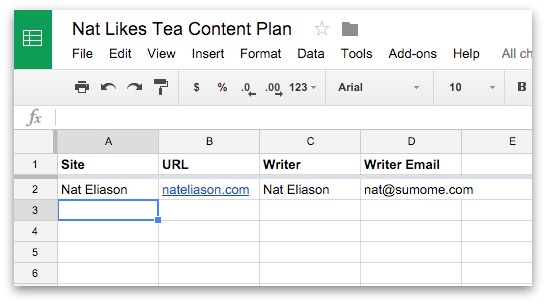
And fill it in with the blogs in a similar niche as you.
The best ways to find these blogs is to:
- See what comes up in Google right now for your topics
- Search on BuzzSumo for posts that performed well related to your topic
- Search on Twitter for people sharing articles from related blogs
If you’re having trouble finding their email addresses, Connectifier or Email Hunter can usually take care of it for you.
Now, with list in hand, it’s time to start writing 🙂
Step 7: Write The First Article
It’s time to pick an article, say “A guide to the different kinds of tea,” and get to work.
While writing it, I’d follow the guidelines for creating epic content that I give to writers for the Sumo blog:
- It must be actionable. Someone should be able to take the post and do something, not just go “oh that’s nice.”
- Focus on ONE core idea. Think of someone searching in Google. What question are they looking for the answer to, and why is your answer the best.
- Think of how you can make it the only article they need on the subject. When someone finds it they should go “whoa I better save this.”
- For length, think 1,500 – 4,000 words. More is fine if it’s kickass (this article is ~5,000). I find it’s hard to do a worthwhile topic justice with anything shorter.
- Use pictures. Make sure the pictures enhance the explanations–some fun photos are fine, but the point of the pictures should be to make whatever you’re saying more clear. No random stock photos.
- Chunk it up. It shouldn’t read like a New Yorker article. There should be helpful headings, sub headings, short paragraphs, bold text, etc.
- Links links links. Include any relevant links in your article. More links = more people we can email about plugging them in order to get them to share it.
- Link to my other articles. I can’t do this in the first one obviously, but for every article after that, this is important for SEO and for keeping people in the site.
These aren’t hard and fast rules, but I find that they help make sure that everything we put out is excellent. They’ll help you make sure of that as well.
As for targeting the article to the keyword you’re going for, don’t worry about that too much. The only thing to make sure of is that you put the keyword in the title. Aside from that, as long as the article is about the topic you’re going for, you should be fine.
If you want to be safe though, you can install Yoast, and use that to check your article for how well it’s set up to rank for your keyword.
Article done? Good. DON’T PUBLISH IT YET. There’s one more important step…
Step 8: Create a Content Upgrade
Before promoting the article, I’d make sure that it’s setup to capture as many email addresses as possible.
The best way to do this is through content upgrades. A content upgrade is any bonus piece of content that builds on what they’re getting for free, and is worth giving up their email address for.
In this case, since the topic is different kinds of tea, I’d put together a 1-page PDF comparing their main differences of each kind of tea with nice visuals, and offer that to the readers, using the “10-minute content upgrades” method.
I’d put it in three places (for an example of this combo, check out my fasting article):
- A page-specific Welcome Mat. Instead of a site-wide Welcome Mat, I’d make one for that article specifically like I did on our Kickstarter Fundraising. This catches people’s attention right when they show up to give them the first offer.
- A page-specific Scroll Box. Just like the Welcome Mat, I’d make a page-specific scroll box that offers the same thing as the Mat. Why the same thing? Because people who didn’t opt in on the Mat might want an opportunity later.
- A click-triggered List Builder Popup. Last, I’d have a call to action at the end of the article that triggers a List Builder popup to give them another chance to sign up for the bonus.
With the content upgrade in place, it’s time to publish that baby promote it!
Step 9: Promote Your Article
For this exercise, we’re assuming that I / you have NO existing audience, just some friends on Facebook.
But, the biggest factor for how highly your article ranks in Google is how many people link to it and read it. Which means that if you want the SEO juice to start flowing, you need to get more people reading it, and more people linking to it.
With that in mind, here’s what I would do to promote the first (and subsequent) articles:
1. Email Your List
I know you haven’t built a list yet, but secretly, you already have one.
Huh?
It’s all your friends. Shoot everyone you’re remotely connected to an email saying:
“Hey [NAME],
I started this new site where I talk about delicious tea.
Let me know if you’re interested in it and I’ll send you an article every now and then 🙂
[YOU]”
Anyone who says yes, add them to your list.
“But Nat, I don’t want to bug my friends”. Get over it. You don’t lose anything by asking, you’ll get the initial bump you need, and you’d be surprised by how many will be interested.
2. Post to Social
I assume you have some Facebook friends.
Post the article to Facebook, tag some people you think would be interested, and see what happens. You’d be surprised by how many of your friends might be interested in what you have to say.
The same goes for Twitter, LinkedIn, and any other network you frequent. I have a number of Snapchat followers from my blog so I’ll post snaps sending them to new articles too.
3. Growth Hack Reddit
I’ve had some crazy success with reddit in the past, with my record being 45,000 visitors in 24 hours (not quite on the front page of reddit, but close).

The great thing about a spike like this is that it sent such a strong signal to Google of my site’s authority that my daily number of organic visitors doubled the next day, and only went up from there.
Eddy wrote a great guide on getting tons of traffic from reddit, but the simple version is:
- Find a few subreddits that allow “link” posts
- Post your link there
- Ask a few friends to give you initial upvotes
There are finer points, like timing your posts, adding comments, and picking subreddits with a low volume to subscriber ratio, so I’d recommend checking out the post.
Two warnings though:
- (Some) people on reddit are assholes and will hurt your feelings. Even when you’re doing well, you’ll get comments that make you a sad panda.
- Reddit is unreliable. I’ve had posts get < 100 visits from reddit, even when I thought they’d do amazing. You can’t rely on it, but when it works it WORKS.
4. Email Everyone You Mentioned
Remember the list of other blogs you mentioned in your post? Now’s the time to cash in on those plugs.
Make a list of everyone you mentioned (and LINKED TO), find their email addresses using Connectifier, and shoot them a quick email.
The fastest way is to just put all their names and email addresses into a spreadsheet (I like spreadsheets, can you tell?) and load them into Connector to quickly email everyone.
Just say “hey I mentioned and linked to you in this post, here’s the link, have a good day.”
Don’t make it a big ask. I get these kinds of emails when people mention Sumo, and it’s annoying as hell when someone says “can you please Tweet it, share it on Facebook, and submit it to GrowthHackers and Inbound?”
Uh, no. I have tea to drink.
Outreach like this does two things: It (hopefully) gets them to share it, and it puts you on their radar so that when they’re writing posts in the future, they link to you, too. This is one of the best things you can do to get initial links.
The bigger their audience, the more helpful this can be from a traffic standpoint too. There was one case where a popular blogger shared one of my articles to her ~700,000 Facebook followers. That was a good day.
5. Submit to Other Relevant Communities
I’m not a big fan of spending time in online communities, but if there’s a good one that you can submit your links to and not worry too much about engaging with then go for it.
For marketing related posts I’ll always submit it to Inbound and Growthhackers, but it’s hard to find link-sharing message boards like those for other niches.
If you want to go deep on communities, check out Sarah’s 0-10k guide and Shannon’s guide to community building.
6. Submit to Quuu
If you join the site Quuu, you can submit links to different categories that are then shared by other Quuu users trying to fill their social media feeds.
I find that adding my articles there gets them another 50-100 shares on Twitter, sometimes way more, and is a quick and easy traffic boost. Especially if you have no initial audience.
Pro tip: Include hashtags for more reach.
7. Pay with a Tweet
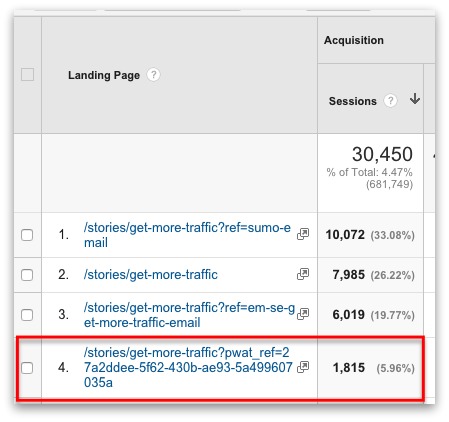
The other thing I might do, if I don’t feel like focusing on getting email addresses for an article, is to do a Pay with a Tweet.
PWAT lets you gate content so that readers have to share your article on Twitter to access it. Results can vary, but for example with the Get More Traffic article I published, the PWAT garnered an extra 1,815 views, which was ~6% of the total.
Step 10. Create a List of Guest Topics
With your first post published and promoted, it’s time to make it work even harder for you.
Add a “Guest posts” worksheet, and come up with as many sub-articles as you can based on the one you just published. Add a column for “base” post, where you’ll list the post that you’re getting the ideas from, to remind you what to link back to when writing.
In this case, since I published “A guide to the different kinds of tea,” I could have subsequent articles on:
- What’s special about Rooibos tea?
- What’s special about Pu-erh tea?
- What’s special about Oolong tea?
- How to tell the difference between Pu-erh and Black tea
- A 1-page summary of the differences in each type of tea
We can also pull in some of the “Later” articles, like each of the ones on “how to brew X tea”:
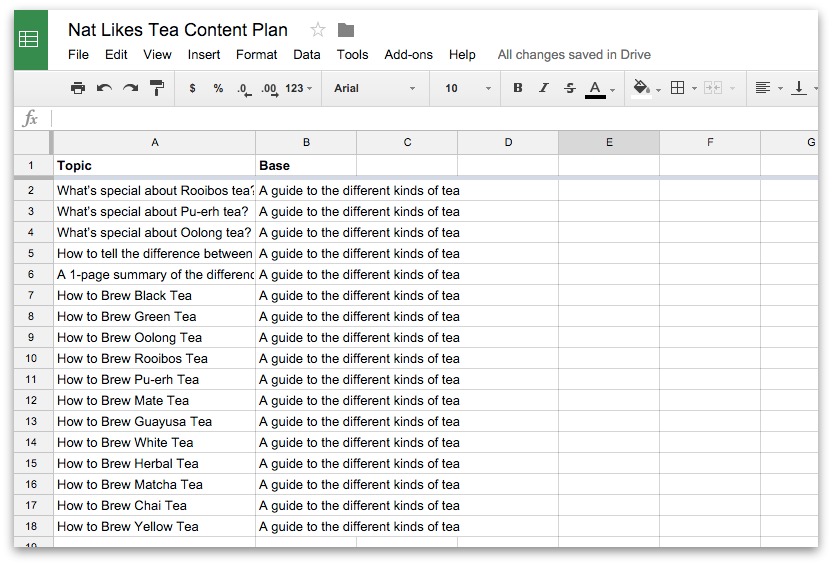
This is the best and easiest way to come up with guest posting topics. You ensure that:
- They’ll be fast to write since you’ve already sort of written them.
- You have an excuse to link back to the article you just wrote.
The whole point of guest posting (for this strategy) is to build links back to yourself and increase your SEO ranking, so you want to write about things that let you easily link to yourself.
This is in-between guest posting and republishing. You don’t want to totally republish your articles because you want the top Google spot, but you also don’t want to spend all your time writing articles for other sites.
With this strategy, you make sure that you’re giving people new content, while keeping it easy for you to make, and while helping your SEO.
Pro tip: Add any of the more in-depth ideas you had that don’t have high SEO value to the guest post list. They’re opportunities for great content that can link back to you, and by having them off site you don’t lose out on SEO potential since they didn’t have much to begin with.
Step 11. Start Guest Posting
With your list of guest post topics, and your list of possible blogs to guest post on, start pitching!
Pick blogs that you think would be good fits for each topic, and send them an email suggesting the guest post.
For a full guide to this, check out our resource on guest posting and converting, which will help you pitch blogs and make sure you get as many email signups as possible from the traffic that it gets you.
When writing the guest posts, make sure you do these things:
- Write really good articles. They shouldn’t be as good as the ones on your site (yeah yeah, I know, everyone else says the opposite, but they’re just saying that so you’ll give them your best content), but they should still be really good.
- Link to yourself tactfully. The point of the guest posts is to build more links back to yourself, so add in a few tactfully. No one wants a guest post with a dozen links that all go back to the author’s site, but no one will complain if you have a few.
- Get it to them ahead of schedule. As someone who manages a blog with a lot of guest posts, being early makes the editor love you forever. Most guest posters are flaky, get things in at the last minute, and make managing a blog a huge pain in the ass, so DON’T BE THAT GUY (or gal).
- Promote it. When you get published on another niche site (don’t worry about promoting it if it’s on Elite Daily, Huffington, etc.), promote it! They might not have a huge amount of traffic yet either so if you can get them some love they’ll want you to come back.
Afterwards, if the site allows it, republish your guest posts on other sites using our handy republishing guide.
This extends the reach of your guest posts, builds more links, and will help get more of those SEO juices flowing your way.
Step 12: Repeat Steps 7 through 11!
Now all you have to do is keep going.
For each of your posts on your own site, promote it as hard as you can, and create your list of related guest posts to link back to it.
When you guest post, plug their articles in your networks, make their lives easy, and be sure you’re sending them great content.
You’ll be in the 10k club in no time 🙂
Bonus Step 1: Re-Target Your Old Posts
Here’s a quick thing you can do when your posts start getting picked up by Google.
You might have originally been going for one keyword, but then you start to get picked up for another tangential one.
When that happens, update the title of your post to fit that new keyword (assuming the volume is higher).
Here’s an example:
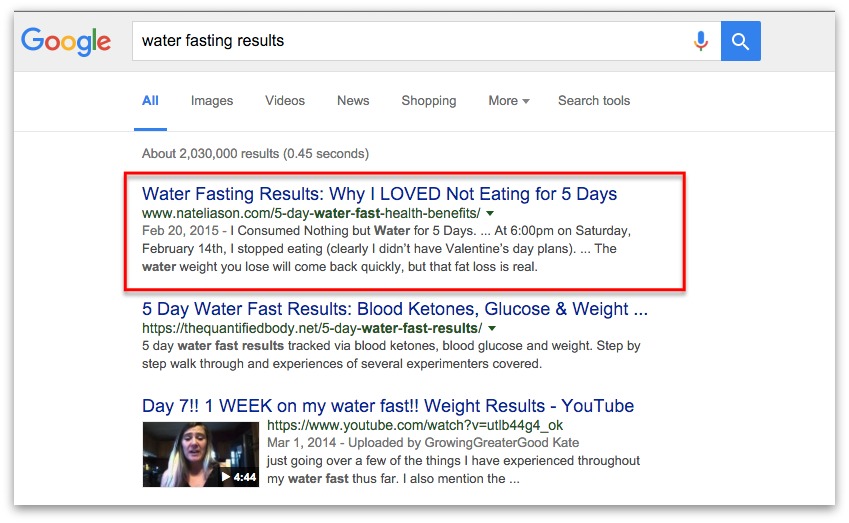
A few months ago, I noticed my article “I Consumed Nothing but Water for 5 Days. Here’s Why, What Happened, and Why it Was Awesome” was ranking #1 for “5 day water fast,” but it was also starting to rank for “water fasting results.”
Then I did some digging, and it turned out that “5 day water fast” had 880 searches a month, but “water fasting results” had 2,400. It was getting 3 times as many searches!

So I changed the meta title of my post (the title that shows up in Google) to be “Water Fasting Results: Why I LOVED Not Eating for 5 Days.” This way, people searching for “water fasting results” would be more likely to click on it.
And then a few weeks later, I was ranked #1 for water fasting results!
When you see an opportunity to adjust your content like this, take it.
Bonus Step 2: Make an Email Course
This is a longer play, but the more email addresses you have, the more people you can promote your new articles too, which results in more traffic, and more traffic results in higher Google rankings…
You get the idea.
Making an email course like we did with Traffic1M or like I did with Programming for Marketers gives you an easy benefit to offer your visitors, and can result in getting thousands of new email addresses you wouldn’t have otherwise.
In the case of Programming for Marketers, I have a site-wide email signup rate of ~15%, just using Welcome Mats and List Builders in all of our articles (in addition to the landing page).
The easiest way to do this is just wait till you have ~5 great articles on your site under a certain theme, then package them into an autoresponder in MailChimp or another email marketing tool, and tell your visitors that they can (in this case) “Sign up to get 5 free lessons on become a tea master” or something similar.
Bonus Step 3: Share This Article
Last thing, If you share this guide, you’ll magically get more traffic to your site.
Okay, maybe I made this one up, but I’d love to give you the finished spreadsheet in return for sharing this guide with your friends.
Best of luck with growing your site, and let me know in the comments if this worked for you!
Add A Comment
VIEW THE COMMENTS